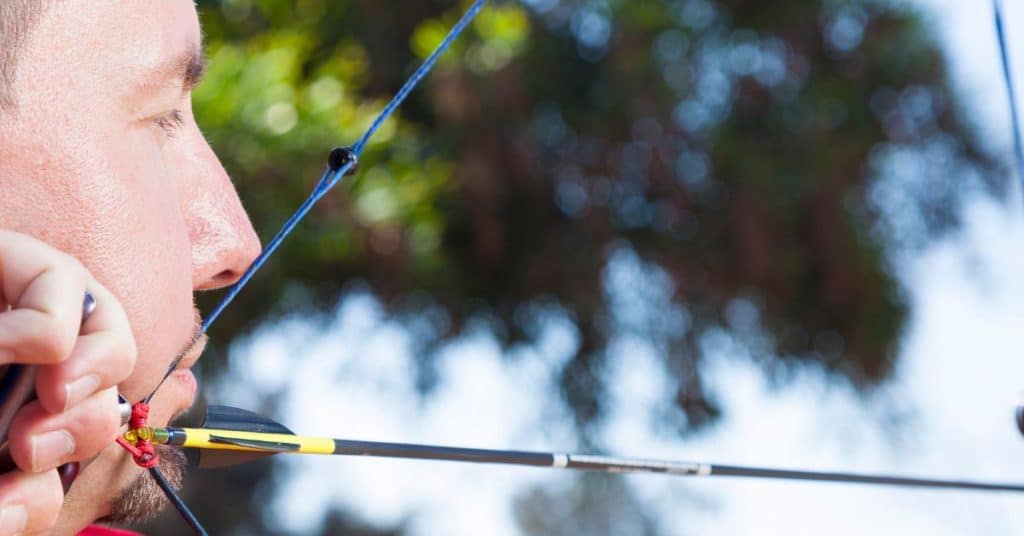
Imagine lining up your shot, drawing back your bowstring with confidence, and releasing the arrow, only to find it veering off course. Frustrating, isn’t it? One common culprit behind such disappointing outcomes is a poorly installed peep sight. Many archers, especially beginners, struggle with installing their peep sights correctly, leading to inaccurate shots and a diminished archery experience.
Common issues such as misalignments, incorrect positioning, and improper sizing often lead to frustration and subpar shooting experiences. But fear not! In this comprehensive guide, we will walk you through the precise steps needed to install a peep sight like a pro. Whether you’re a recreational archer or a dedicated competitor, mastering this crucial skill will significantly enhance your archery journey.
How To Install a Peep Sight Like a Pro
Step 1: Preparing the Bow for Installation
Before installing the peep sight, ensure that your compound bow is properly set up with essential components such as the rest, D-loop, and knocking point. These components play a significant role in the stability and performance of your bow, contributing to accurate shooting.
To begin the installation process, it is recommended to shoot a few arrows through the bow without the peep sight. This action helps to settle the bow and establish stability. Once the bow feels steady, the next step is to install the peep sight.
Step 2: Measuring for Optimal Peep Sight Placement
To achieve precise peep sight placement, it is beneficial to have a second person assist you. Ask a friend or fellow archer, to help mark the string at the approximate level of your eye using a sharpie. This reference point will serve as a starting point for peep sight positioning.
To determine the appropriate height for your peep sight, always remember to measure from the center of your existing peep sight to the center of the nock. Also, keep in mind you must maintain the normal shooting position while marking the location for the peep.
After marking the reference point, come to full draw and anchor in. Assess the marked spot and adjust the peep sight accordingly. While the initial mark serves as a good starting point, minor adjustments up or down may be necessary to align it perfectly with your eye level.
When choosing a compound bow, it’s important to consider the axial length and brace height as they can slightly affect the optimal peep sight position. For bows with shorter axial lengths, the peep sight may need to be positioned higher due to sharper string angles. Conversely, longer axial bows may require a slightly different placement due to less sharp string angles. With that in mind, I recommend the best compound bow under 500 dollars that strikes a balance between these factors and offers excellent performance.
Utilizing a Bow Square for Precise Alignment
To determine the precise peep sight placement, you can also use a bow square. At full draw, have someone measure from the center of the peep straight down to the center of the arrow shaft to have a reference point between your anchor position and your eye. Since facial bone structure remains constant, this measurement will be consistent regardless of the bow’s axial length or brace height.
Knowing your measurement for the peep sight at full draw is invaluable. It allows you to maintain a consistent alignment and eye position, enhancing your shooting accuracy.
Peep Sight Placement Technique Without Assistance
If you find yourself without any assistance, you can still achieve the ideal placement for your peep sight. Follow these steps to optimize its positioning:
Setting the Sight Distance:
Start by adjusting your sight distance to a mid-range setting, approximately 40 to 45 yards. This distance will serve as a reference point for your peep sight alignment.
Aligning the Peep Sight:
Now, focus on aligning your peep sight with the sight housing. When you look through the peep sight, it should align perfectly with the center of the sight housing. Avoid any misalignment, such as being too high or too low. Ideally, you want the peep sight and sight housing to mesh seamlessly, creating a clear and centered view.
Checking Peep Sight Adjustment:
To ensure your peep sight is properly aligned, draw your bow and settle into your anchor position. Assess the alignment of the peep sight and make any necessary adjustments. If needed, move the peep sight slightly up or down until it aligns perfectly with the sight housing.
Securing the Reference Point:
- Take your marker and place a black mark at the center of the string, right where your peep sight is located. This mark will serve as a reference point for future adjustments.
- By marking the string, you can easily return the peep sight to its original position if it accidentally gets moved or adjusted.
What if you don’t have a sight installed on your bow? If that’s the case, follow these steps:
- Close your eyes and pull the bowstring back until you reach your anchor point—the consistent spot where you draw the string every time.
- With the bow at full draw, open your eyes as though you were peering through the peep sight.
- Take a moment to evaluate the alignment of the sight and make note of any discrepancies.
- Based on this visual assessment and considering your shooting style, make subtle adjustments to the placement of the peep sight.
This process allows you to tailor the placement to your unique needs, ensuring an optimal fit that enhances your shooting experience.
Step 3: Proper Installation and Tying Technique
Once you’ve determined the correct height for your peep sight, it’s time to install it securely.
Consider the color of your bowstring to ensure balanced placement. For two-colored strings, evenly divide the colors, maintaining a central position for the peep sight and promoting a straight alignment as the string is drawn back.
To determine the number of fibers in a single-color string, count the total number of fibers in the string and divide it by two to achieve an even fiber bundle. However, most manufacturers provide a marking string to identify the true center of the single-color string.
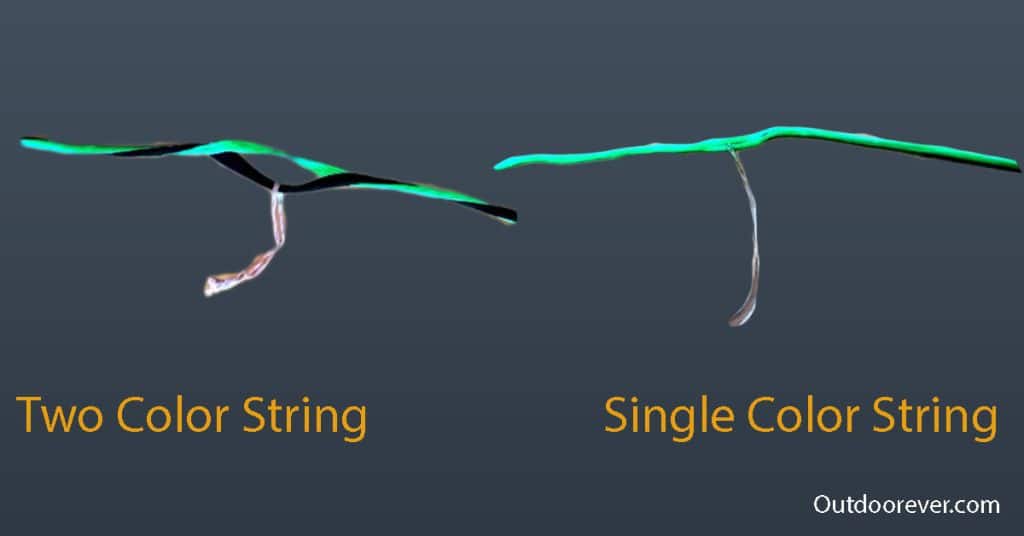
It is important to carefully examine the bowstring as it is typically constructed by looping together two sets of fibers. The peep sight should be positioned between these bundles to ensure proper alignment.
This alignment allows the bowstring to rotate naturally, avoiding any alignment issues with the peep sight. To identify the natural split between the bundles, you may need to untwist the bowstring significantly until you observe the separation of the bundles.
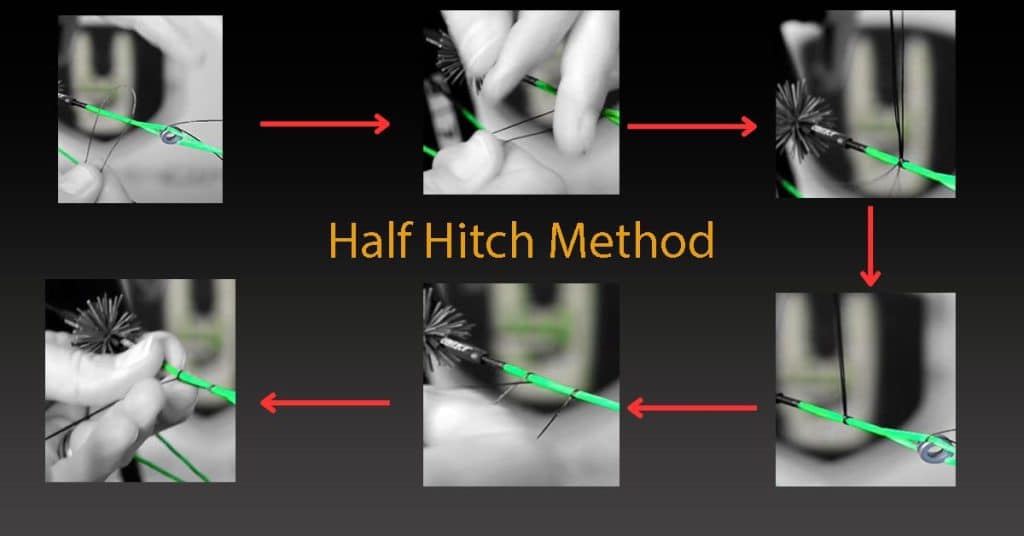
Process Of How to Tie the Peep Sight Securely
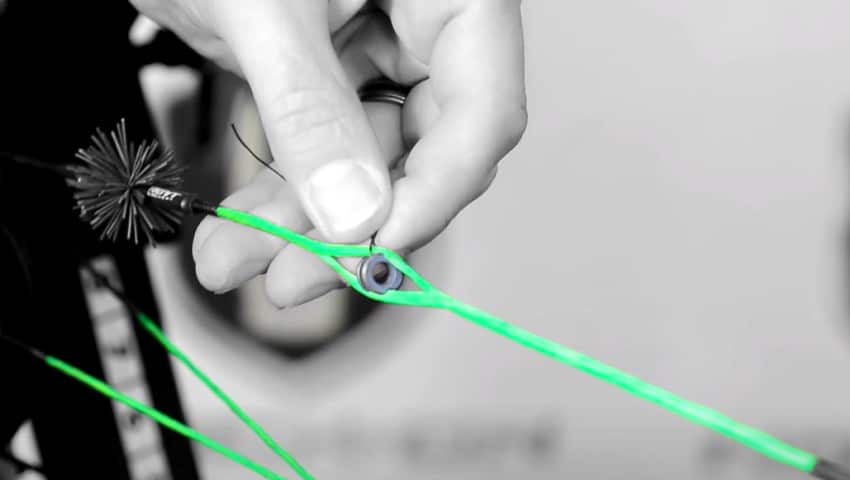
To tie the peep sight securely in place, follow these steps:
- Use a bow press to create slack in the string, ensuring safety and stability.
- Separating the two intertwined strands of the bowstring at the marked spot
- Remove any serving material between the strands to create an attachment point for the peep sight.
- Align the peep sight with the marked reference point on the string, facing down towards you. Check that the peep sight’s grooves match your bow’s specific characteristics, such as axle-to-axle length and draw length. Manufacturers often provide charts or online resources to guide you in selecting the appropriate groove.
- Insert the peep sight in the center of the string, aligning it with the desired position.
- Take a serving material and cut the length of the serving string (thin synthetic thread designed for archery) to approximately 24 inches and fold it in half to create a loop.
- Pull both tags through the center of the loop, creating a secure attachment point.
- Hold both sides of the string and wrap it around, pulling it through the middle, this is known as a half hitch.
- Repeat the half-hitch process four times, maintaining tightness and security.
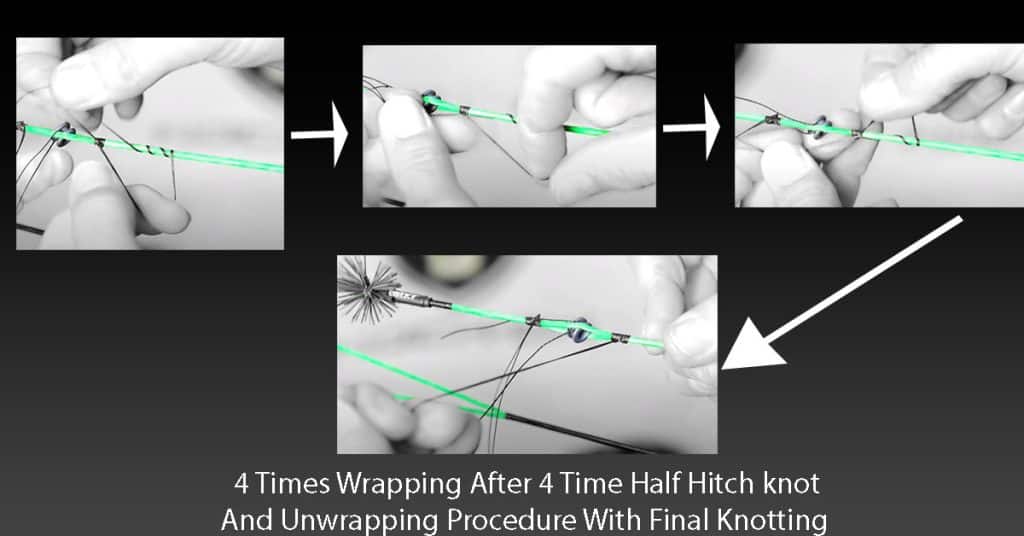
- On the fifth time, wrap the string in the center four times and pull it all the way across.
- Unwrap the last set of wraps.
- Grab the tag of the loop and pull the slack out to secure the peep sight.
- Repeat the same process on the other side.
- Applying super glue or melting the stubs of the serving string for a seal or you can apply a layer of wax to the serving for added security and to prevent the knots from unraveling.
Step 4: Adjustment and Finalizing
To ensure optimal performance, we need to make final adjustments and validate the installation. Follow these steps:
- Draw the bow multiple times and shoot it at a close target to settle the string and ensure proper alignment.
- Make adjustments by adding twists to the string. One twist at the bottom of the string rotates the peep sight approximately 90 degrees.
- The peep sight should face straight back when the bow is at rest and align perfectly at full draw. Adjust the loop of the peep sight so that it faces straight back towards you and aligns with the center of the peep sight. Securely stretch and anchor the loop in place using loop pliers.
- Use loop pliers to securely stretch and anchor the peep sight’s loop in place.
Step 5: Testing and Tuning
Conduct a final testing phase to evaluate the accuracy and clarity of your sight picture. Have someone observe your shots from behind to provide feedback on any required sight adjustments. Make incremental changes and test each adjustment before making further modifications to achieve optimal performance.
Conclusion
Installing a peep sight on your bow can significantly improve your accuracy and shooting experience. Following the step-by-step guide in this article, you can easily install a peep sight yourself with just a few basic tools and a little patience. Selecting the right size and style of peep sight for your bow and ensuring proper alignment for optimal performance is important. Also, measure carefully and consider using a bow square for precise alignment. After installation, don’t forget to test, make necessary adjustments, and fine-tune for optimal alignment.
About The Author:
Lake Streeter, A Gun enthusiast, and loves to hunt in the middle of the wood. Always check the latest hunting gears out in the market and try to share his honest opinion with the audience in Hunting Nook.